TL;DR
GitHub-hosted runners get a random IP on every run — you can’t allowlist them against private infrastructure. Cloudflare Zero Trust WARP solves this by giving the runner a verified identity instead of a trusted IP. A dedicated service account in Cloudflare Access, a 30-minute session policy, and five lines of YAML in your workflow — your ephemeral runner is inside your private network perimeter for exactly as long as the job runs, then the tunnel closes. No self-hosted runners. No static IPs. No firewall exceptions that outlive the pipeline.
If you’re new to the Zero Trust model underpinning this, start with Zero Trust Networking: Identity Meets the Network — this post builds directly on those concepts and won’t re-explain them here.
The Problem That Kills “Private-by-Default” Infrastructure
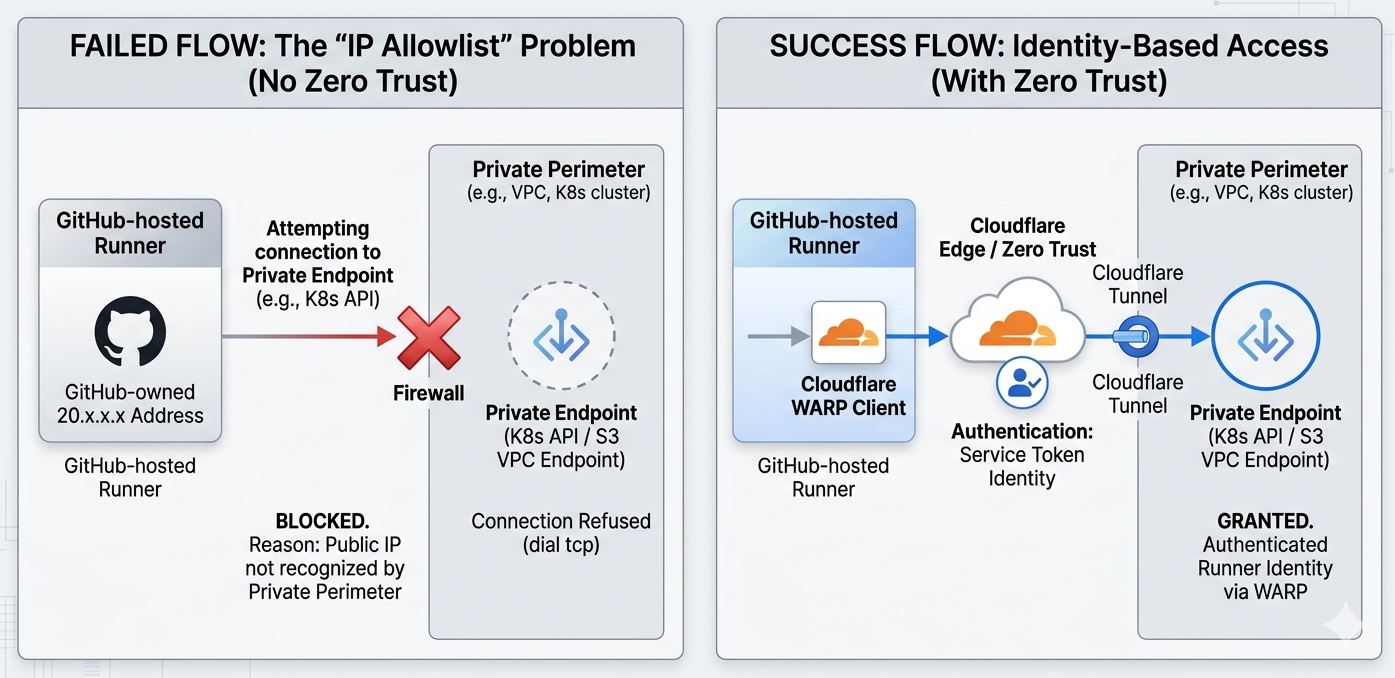
You’ve done the right thing: Terraform state in a private S3 bucket behind a VPC endpoint, Kubernetes API servers with no public access, internal registries that aren’t routable from the internet. Then someone runs terragrunt apply from a GitHub Actions workflow and it fails immediately — dial tcp: connection refused — because the runner is sitting on a GitHub-owned 20.x.x.x address that your infrastructure has never heard of.
The usual fixes are worse than the problem. Allowlisting GitHub’s IP ranges means tracking a JSON file that changes without notice and opening your security perimeter to every GitHub-hosted runner, not just yours. Moving to self-hosted runners trades one problem for another: you’re now responsible for runner lifecycle, scaling, patching, and the blast radius when someone misconfigures one. And statically routable bastion hosts defeat the purpose of having a private perimeter in the first place.
The missing piece is identity-based network access — not “this IP can connect” but “this authenticated service account can connect, for this session, to these resources, and nowhere else.” That distinction is the core of Zero Trust applied to machines, not just humans.
Setting Up the Cloudflare Service Account
This is the part most tutorials skip — they hand you three secret names and assume you already have the Cloudflare side configured. Here’s exactly what “service account” means in Cloudflare Access and how to set it up.
Step 1: Create a Service Token
In your Cloudflare Zero Trust dashboard, navigate to Access controls → Service credentials → Service Tokens and create a new token. Name it something that ties it clearly to its purpose — github-actions works well.

The token has two credentials: a Client ID and a Client Secret. These are generated once — copy them immediately, the secret won’t be shown again. The token’s duration is configurable; a 2-year expiry is common for a stable CI integration, but you should plan for rotation.
These two values become CLOUDFLARE_AUTH_CLIENT_ID and CLOUDFLARE_AUTH_CLIENT_SECRET in your GitHub repository secrets.
Step 2: Create an Access Policy
The service token alone doesn’t grant network access. You need an Access policy that authorises it to connect. In Access controls → Policies, create a new policy with these settings:
- Action:
Service Auth— this is specifically for machine-to-machine authentication, distinct from the human identity flows - Policy rule: Include → Any Access Service Token
- Policy session duration: 30 minutes is the right default for a CI job — long enough for any reasonable pipeline run, short enough that a leaked or compromised session has minimal blast radius
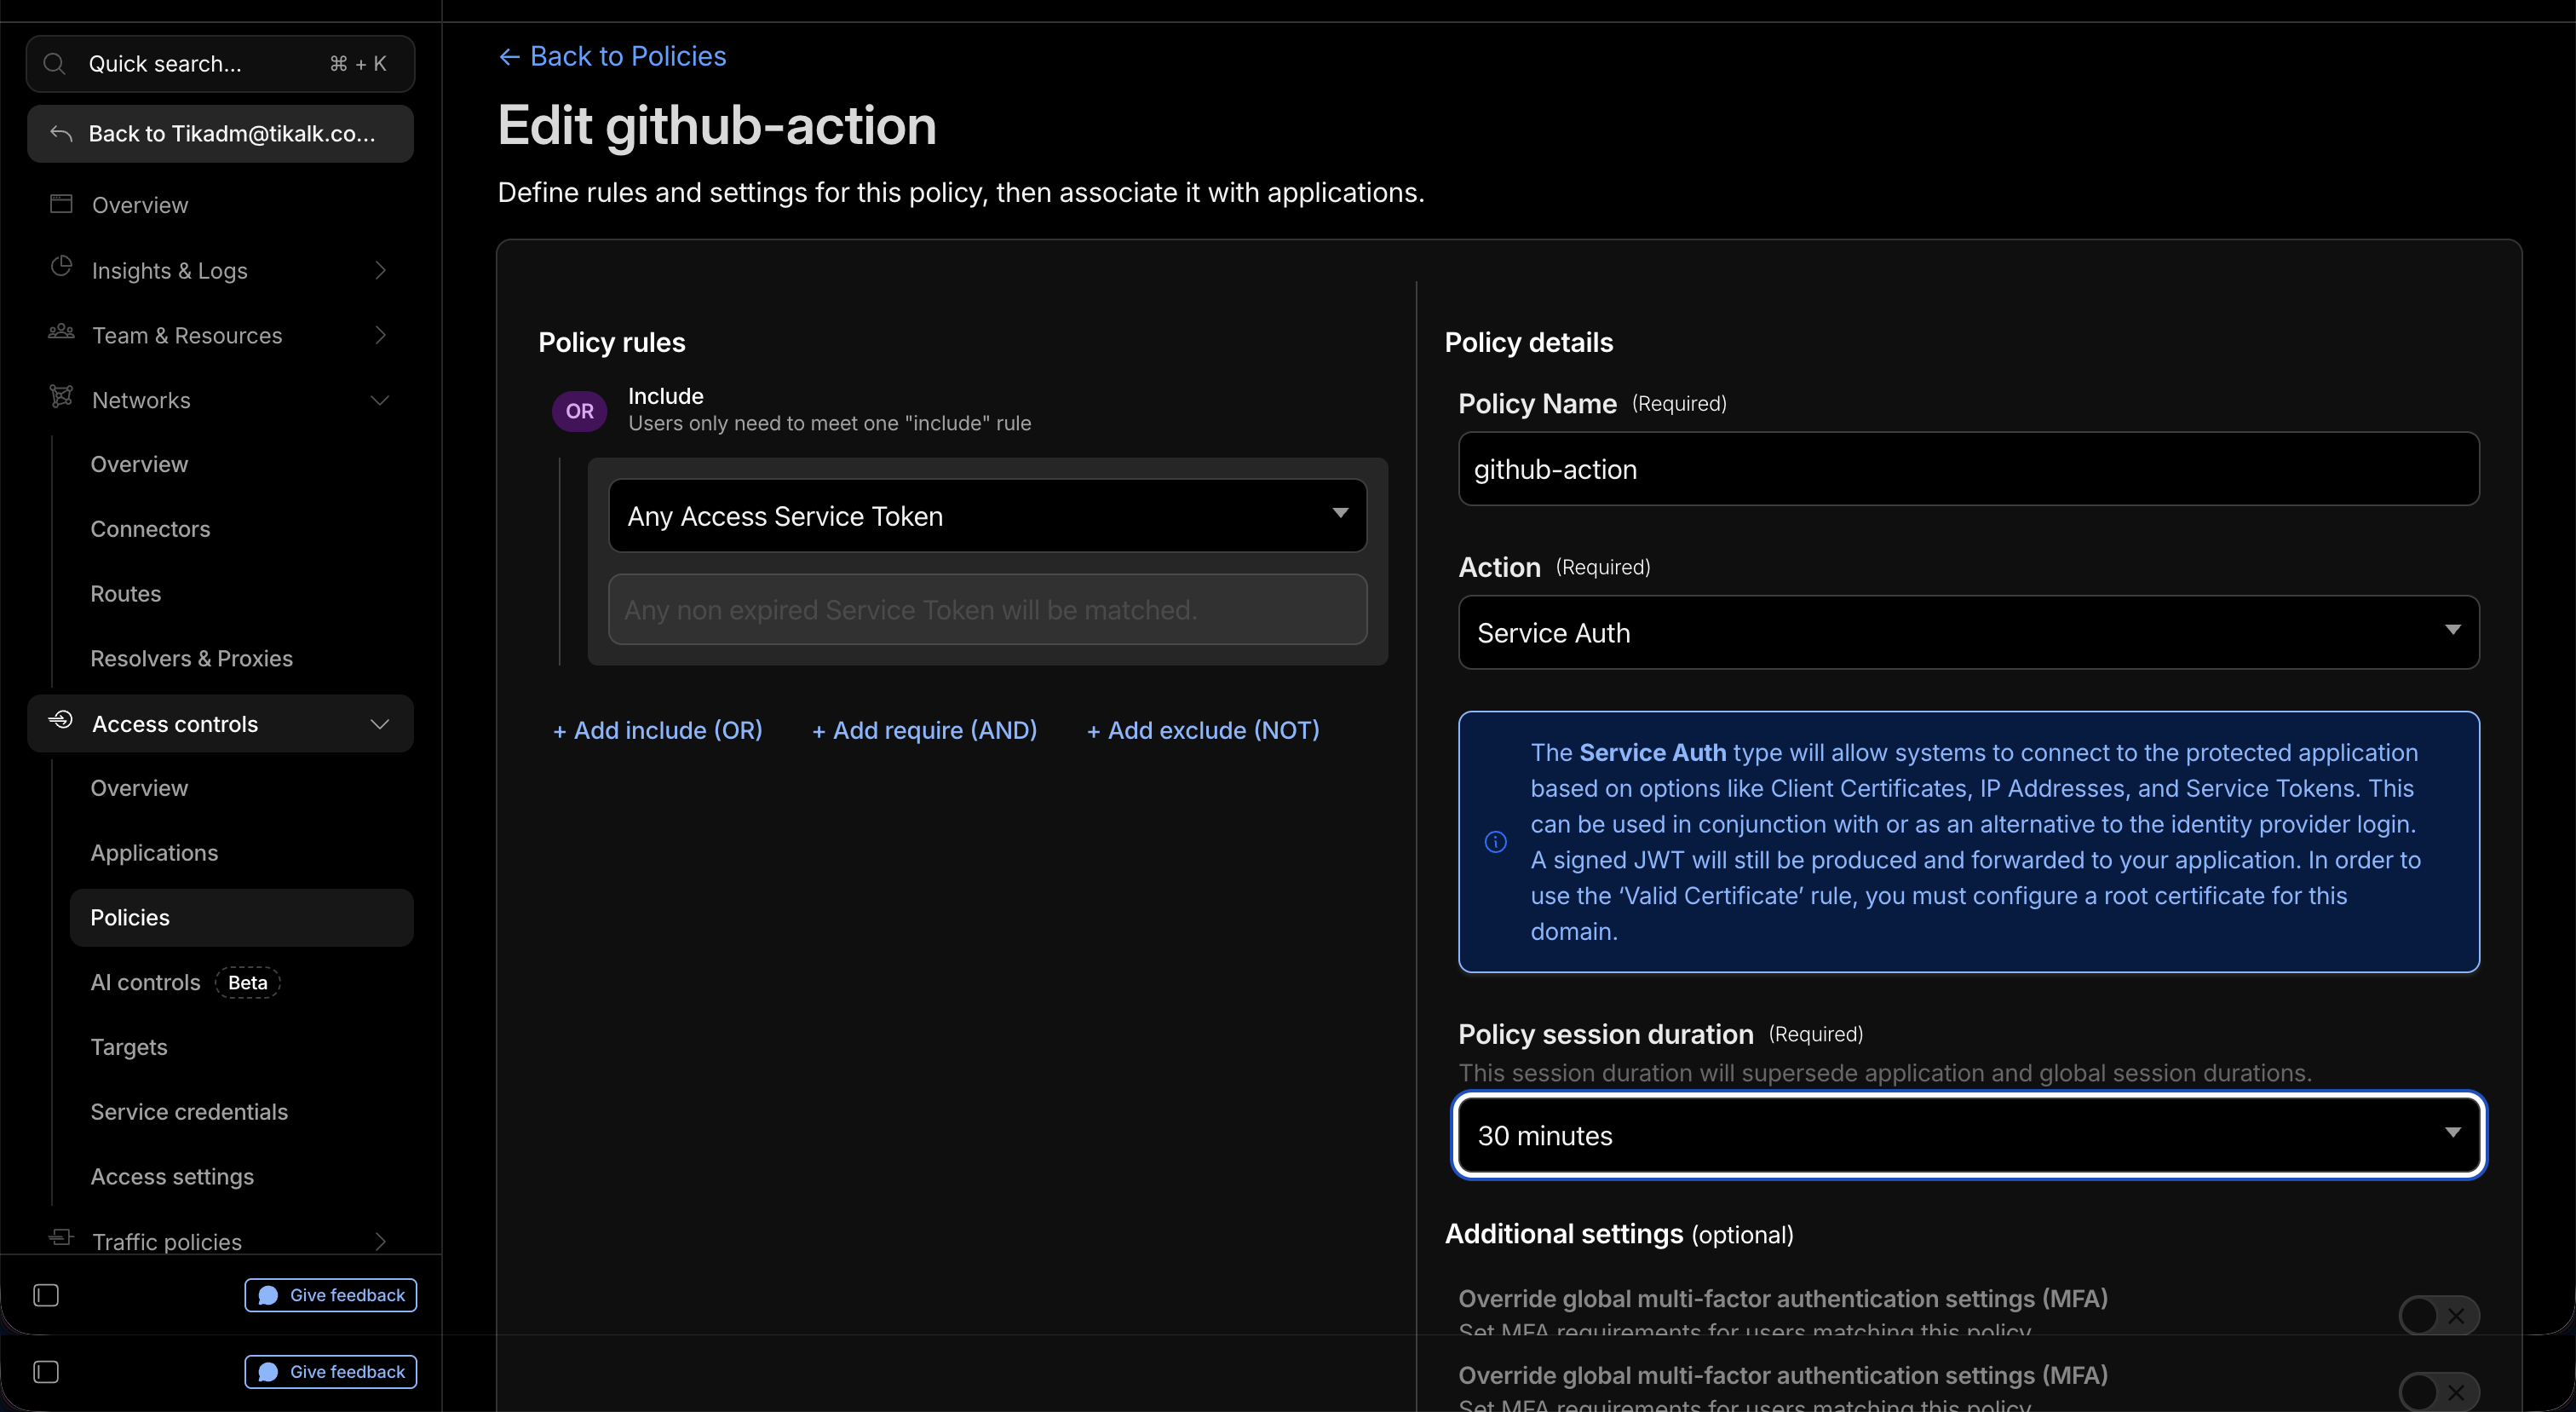
The Service Auth action type is what makes this a machine identity, not a human one. Cloudflare’s note on that screen is worth reading: a signed JWT will be produced and forwarded to your application — it’s this JWT that your private endpoints (or Cloudflare Tunnel) can verify, not a long-lived key. The 30-minute session means even if a runner is compromised mid-job, the session expires within the job lifecycle.
Then associate this policy with the application or network that your runners need to reach — your private Terraform state backend, your private Kubernetes API, whatever the target is. The service account can only reach what the policy explicitly allows.
Your third secret — CLOUDFLARE_ORGANIZATION_ID — is the slug from your Zero Trust organisation name, visible in the dashboard URL and in Settings → General.
What the Tunnel Actually Does
Most discussions of Cloudflare Zero Trust center on browser-based access or device-posture checks for humans. The service token mechanism gives machines the same capability without requiring a user present.
The flow during a pipeline run:
- The runner starts. It has no identity Cloudflare recognises — just another ephemeral
20.x.x.xGitHub IP. - The
setup-cloudflare-warpaction installs the WARP client, presents the org ID + client ID + client secret, and authenticates with Cloudflare Access. - Cloudflare verifies the service token against the
github-actionpolicy, issues a short-lived JWT, and gives the runner a virtual network interface routed through your Zero Trust tunnel. - From that point forward, any process on the runner —
terragrunt plan,kubectl,curl— sees your private network as reachable. Your private endpoints see traffic arriving from your Zero Trust perimeter, not a random GitHub IP. - The job ends. The runner is destroyed. The WARP session (at most 30 minutes) dies with it. No cleanup step needed on the GitHub Actions side.
The scoping is the key security property: this service account can only reach what its associated policy allows. It’s not a skeleton key to your entire internal network.
The Implementation
Here’s the actual workflow, exactly as it runs:
# .github/workflows/warp.yaml
name: Warp connection test

on:
  workflow_dispatch:

concurrency:
  group: ${{ github.head_ref || github.ref_name }}
  cancel-in-progress: true

permissions:
  contents: write
  pull-requests: write
  id-token: write
  statuses: write

jobs:
  warp-connection-test:
    runs-on: ubuntu-latest
    steps:
      - name: Checkout repository
        uses: actions/checkout@v4

      - name: Setup Cloudflare Warp
        uses: Boostport/setup-cloudflare-warp@v1
        with:
          organization: ${{ secrets.CLOUDFLARE_ORGANIZATION_ID }}
          auth_client_id: ${{ secrets.CLOUDFLARE_AUTH_CLIENT_ID }}
          auth_client_secret: ${{ secrets.CLOUDFLARE_AUTH_CLIENT_SECRET }}

      - name: Ping private host
        run: |
          ping -c 4 10.1.10.165  # private IP — unreachable without the tunnel
The Boostport/setup-cloudflare-warp@v1 action handles WARP daemon installation, certificate trust, and tunnel health verification. It blocks until the tunnel is confirmed active — every subsequent step in the job runs inside the perimeter.
Wiring It Into a Terragrunt Pipeline
Once the tunnel is up, plug your Terragrunt steps in directly after setup-cloudflare-warp. They reach whatever the policy allows — private state backends, private provider registries, private Kubernetes endpoints — with no Terragrunt-specific configuration needed. The tunnel is transparent at the OS network level:
jobs:
  terragrunt-apply:
    runs-on: ubuntu-latest
    steps:
      - uses: actions/checkout@v4

      - name: Setup Cloudflare Warp
        uses: Boostport/setup-cloudflare-warp@v1
        with:
          organization: ${{ secrets.CLOUDFLARE_ORGANIZATION_ID }}
          auth_client_id: ${{ secrets.CLOUDFLARE_AUTH_CLIENT_ID }}
          auth_client_secret: ${{ secrets.CLOUDFLARE_AUTH_CLIENT_SECRET }}

      # Everything below runs inside the Zero Trust perimeter
      - name: Setup Terraform + Terragrunt
        uses: ./.github/actions/terraform-tools
        with:
          terraform-version: "1.11.4"
          terragrunt-version: "0.77.20"

      - name: Terragrunt Plan
        run: terragrunt run-all plan --terragrunt-non-interactive
        env:
          AWS_REGION: ${{ vars.AWS_REGION }}

      - name: Terragrunt Apply
        if: github.ref == 'refs/heads/main'
        run: terragrunt run-all apply --terragrunt-non-interactive
The same pattern applies to GitLab CI, with one difference: GitLab shared runners persist between jobs, so you need an explicit disconnect in after_script. GitHub Actions handles it automatically because the runner is destroyed:
# .gitlab-ci.yml
before_script:
  - curl -fsSL https://pkg.cloudflareclient.com/pubkey.gpg | apt-key add -
  - apt-get install -y cloudflare-warp
  - warp-cli register
  - warp-cli connect
  - ping -c 2 10.1.10.165  # verify before proceeding

after_script:
  - warp-cli disconnect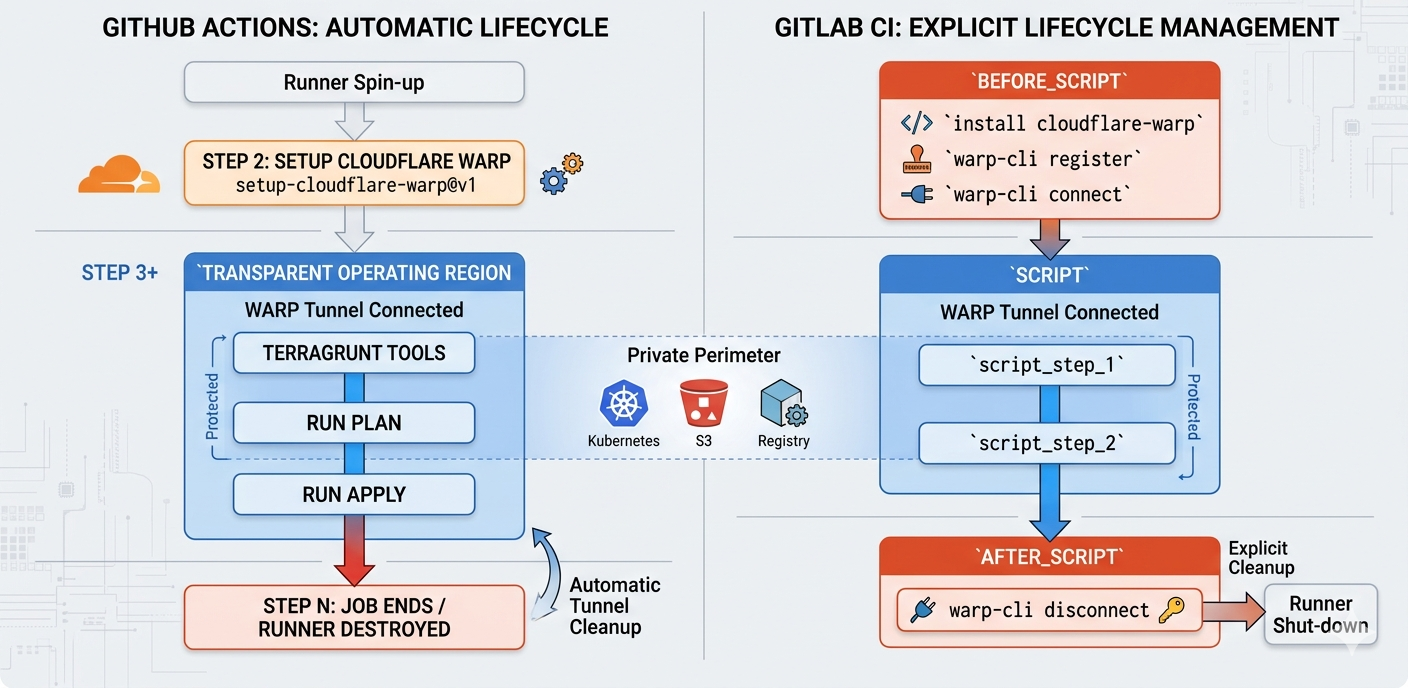
What Actually Went Wrong (And What to Watch For)
The first time I wired this up, the tunnel established fine but Terragrunt still couldn’t reach the private state backend. Not a tunnel problem — a DNS problem. The private endpoint lived behind a private hosted zone on Route 53, and Cloudflare’s gateway resolver doesn’t know about your split-horizon zones. The runner’s /etc/resolv.conf was pointing at Cloudflare’s resolver after WARP connected, which silently NXDOMAINed every private hostname.
Fix: configure a Cloudflare Gateway DNS policy to forward your private domain (.corp.example.com, .internal, or your equivalent) to your internal resolver. Once that was in place, both ping 10.1.10.165 and ping private-state-backend.corp.example.com resolved correctly.
Second issue: Boostport/setup-cloudflare-warp@v1 adds roughly 25–35 seconds to job startup — WARP client install, device registration, tunnel health check. For a 20-minute Terragrunt run that’s noise. For lint or unit-test jobs with tight feedback loops, don’t add WARP at all — keep it scoped to jobs that actually need private network access.
Third: the CLOUDFLARE_AUTH_CLIENT_SECRET has the sensitivity of a private key. The service token in the screenshot has a 2-year expiry — that’s convenient but means you need a rotation plan. Cloudflare lets you issue a replacement token before revoking the old one, so rotation is zero-downtime. Put it in your team calendar now, not six months before expiry.
Conclusion
The pattern is simple enough to fit in a tweet but closes a real gap: GitHub-hosted runners are stateless and unpredictable at the network layer, which makes “private-by-default” infrastructure painful to automate from the start. Cloudflare WARP with a properly scoped service account turns identity into a network credential — the runner earns its access, uses it, and leaves no permanent hole behind. If you’re running Terragrunt against private endpoints today and the answer is “self-hosted runners” or “we allowlist GitHub’s ranges,” this is the upgrade worth making.
Add to GLOSSARY const in src/layouts/PostLayout.astro: ‘WARP’: { full: ‘Cloudflare WARP — Zero Trust network client’, url: ‘https://developers.cloudflare.com/cloudflare-one/connections/connect-devices/warp/’ }, ‘ZTA’: { full: ‘Zero Trust Architecture’, url: ‘https://www.nist.gov/publications/zero-trust-architecture’ }, ‘VPC’: { full: ‘Virtual Private Cloud’, url: ‘https://docs.aws.amazon.com/vpc/latest/userguide/what-is-amazon-vpc.html’ }, ‘JWT’: { full: ‘JSON Web Token’, url: ‘https://datatracker.ietf.org/doc/html/rfc7519’ }, —>
Discussion